Before you can start analyzing data with Python, you need the right tools installed on your computer.
While there are multiple ways to set up Python, Anaconda provides the most beginner-friendly approach by bundling everything you need in one package.
Why Anaconda?
Setting up Python for data analysis traditionally involves installing Python itself, then individually adding dozens of libraries and managing compatibility issues. Anaconda eliminates this complexity by providing a complete distribution that includes:
1. Python: The core programming language.
2. Essential libraries: NumPy, Pandas, Matplotlib, and 250+ other packages pre-installed.
3. Jupyter Notebook: An interactive coding environment perfect for data analysis.
4. Package manager: Easy installation and updating of additional libraries.
5. Environment management: Keep different projects separated with their own dependencies.
Think of Anaconda as a one-stop shop that saves you hours of configuration time and potential troubleshooting headaches.
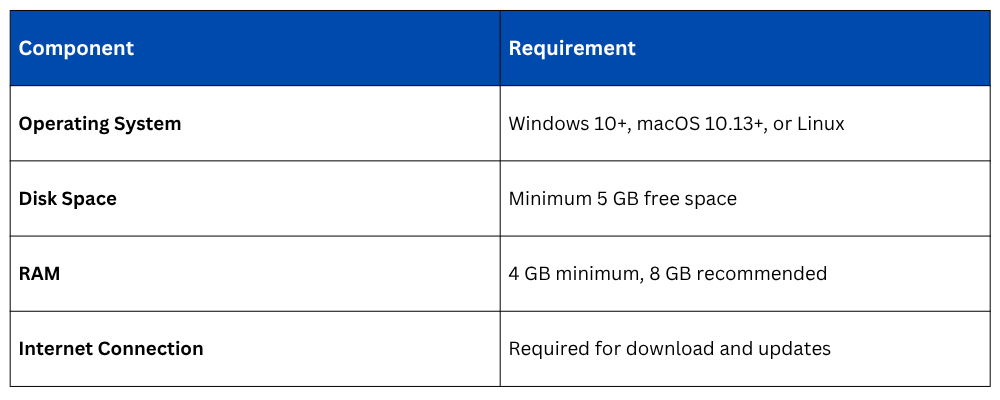
System Requirements
Before installation, verify your computer meets these basic requirements:
Installing Anaconda
The installation process is straightforward and similar across all operating systems.
Step 1: Download Anaconda
Visit the official Anaconda website at https://www.anaconda.com/download and download the installer for your operating system. The download is approximately 500 MB and includes Python 3.x (always choose the latest Python 3 version, not Python 2).
Step 2: Run the Installer
For Windows:
1. Double-click the downloaded .exe file
2. Click "Next" through the welcome screens
3. Choose "Just Me" for installation type (recommended)
4. Select installation location (default is fine for most users)
5. Important: Check "Add Anaconda to my PATH environment variable" if you want to use Anaconda from any command prompt
6. Complete the installation (takes 5-10 minutes)
For macOS:
1. Double-click the downloaded .pkg file
2. Follow the installer prompts
3. Enter your password when requested
4. Complete the installation
For Linux:
1. Open terminal and navigate to the download location
2. Run the command:

3. Follow the prompts, press Enter to review the license
4. Type yes to accept the license terms
5. Confirm the installation location
6. Type yes when asked to initialize Anaconda
Step 3: Verify Installation
After installation completes, verify everything works correctly.
Open your terminal or command prompt and type:

You should see output like conda 24.1.2 confirming Anaconda is installed properly.
Next, check Python:

This should display something like Python 3.11.5.
This should display something like Python 3.11.5.
Launching Jupyter Notebook
Jupyter Notebook is where you'll spend most of your time writing and executing Python code for data analysis.
Method 1: Using Anaconda Navigator (Easiest for Beginners)
1. Open Anaconda Navigator from your applications menu.
2. The Navigator interface displays various tools and applications.
3. Find "Jupyter Notebook" and click the "Launch" button.
4. Your default web browser will open automatically showing the Jupyter interface.
5. You'll see a file browser displaying your home directory.
Method 2: Using Command Line (Faster Once Familiar)
Open your terminal or command prompt and type:

Press Enter, and Jupyter will start, automatically opening in your browser at http://localhost:8888/.
Understanding What Just Happened
When you launch Jupyter Notebook, it starts a local server on your computer. The browser interface is just a way to interact with this server—you're not actually working online. Even without internet, Jupyter functions perfectly for data analysis.
Navigating the Jupyter Interface: When Jupyter opens in your browser, you'll see the dashboard—your starting point for all work.
Creating Your First Notebook
1. Navigate to the folder where you want to work using the file browser.
2. Click the "New" button in the upper right corner.
3. Select "Python 3" from the dropdown menu.
4. A new notebook opens in a separate browser tab.
Understanding Notebook Structure
A notebook consists of cells—individual blocks where you write code or text:
Code cells: Where you write and execute Python code.
Markdown cells: For adding explanatory text, headings, and documentation.
Basic Operations
To write code, simply click in a cell and start typing:

To execute the code, press Shift + Enter. The output appears immediately below the cell.
To add a new cell, press B (for below) or A (for above) while in command mode, or use the "+" button in the toolbar.
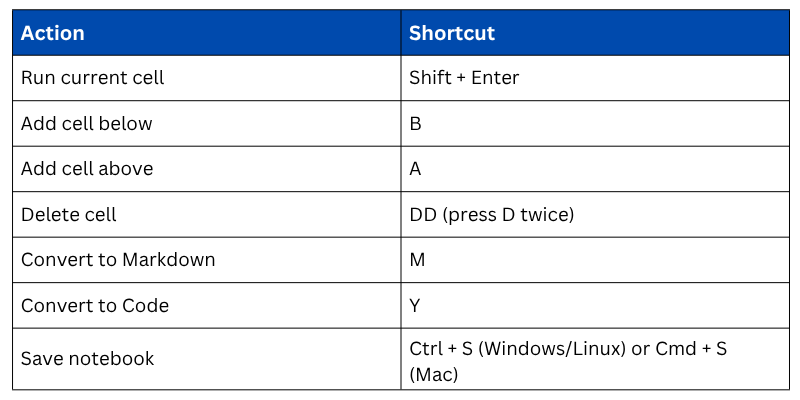
Essential Jupyter Shortcuts
Learning these keyboard shortcuts will significantly speed up your workflow:
Installing Additional Packages
While Anaconda includes most essential libraries, you may occasionally need additional packages.
Open a new code cell in Jupyter and run:

For example, to install a visualization library:

Alternatively, use conda from the terminal:

The conda method is generally preferred within the Anaconda ecosystem as it handles dependencies more reliably.
Organizing Your Work
Establish good organizational habits from the beginning:
Create a Dedicated Folder Structure
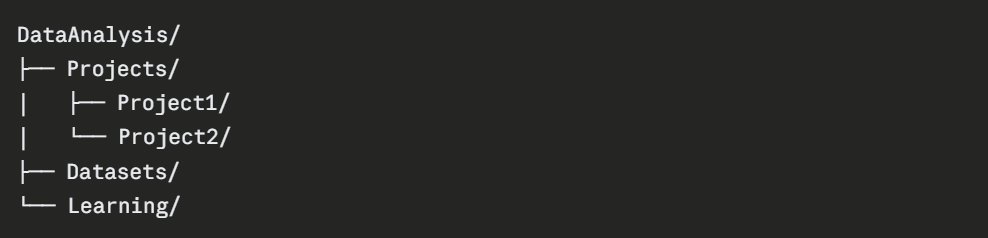
Navigate to your working folder before launching Jupyter, or use Jupyter's file browser to create and organize folders directly.
Naming Conventions
1. Use descriptive notebook names: sales_analysis_2024.ipynb instead of notebook1.ipynb.
2. Avoid spaces in filenames; use underscores instead.
3. Include dates for time-sensitive analysis.
Troubleshooting Common Issues
Jupyter Won't Launch
1. Ensure no other Jupyter instance is already running.
2. Try closing all browser windows and relaunching.
3. Check if port 8888 is blocked by another application.
Browser Shows "Unable to Connect"
1. Copy the URL with token from the terminal output.
2. Paste it directly into your browser.
3. Try a different browser if issues persist.
Packages Not Found
1. Verify you're using the Anaconda Python (run which python in terminal).
2. Update Anaconda: conda update anaconda.
3. Reinstall the package using conda instead of pip.
Testing Your Setup
Confirm everything works by creating a test notebook and running this code:
python
import numpy as np
import pandas as pd
import matplotlib.pyplot as plt
# Create sample data
data = pd.DataFrame({
'x': range(1, 11),
'y': np.random.randint(10, 100, 10)
})
# Display data
print(data)
# Create simple plot
plt.plot(data['x'], data['y'])
plt.title('Test Plot')
plt.show()
If you see a DataFrame printed and a line chart displayed, congratulations—your environment is fully configured and ready for data analysis!