Before you can write a single line of Python code, you need to set up the right environment on your computer. Think of this as preparing your workspace before starting a project, having the right tools in place makes everything smoother.
What is a Python Environment?
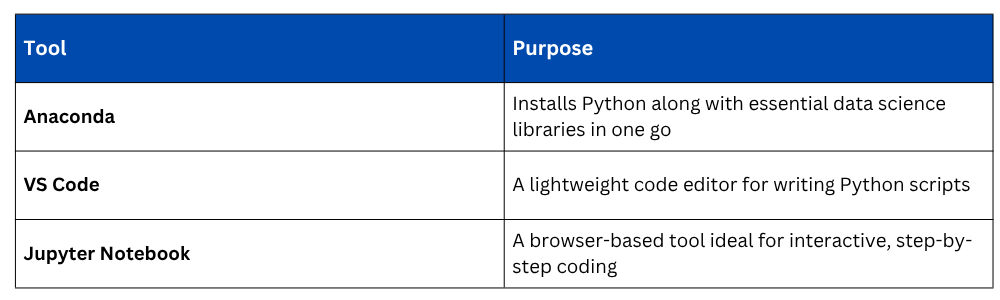
A Python environment is simply the combination of Python itself and the tools you use to write and run code. There are different ways to set this up, but for AI and data science work, three tools are most commonly used together:
Step 1: Installing Anaconda
Anaconda is the recommended starting point for anyone learning Python for AI or data science. It bundles Python, over 250 libraries (including NumPy, Pandas, and Matplotlib), and Jupyter Notebook, all in a single installer.
How to Install:
1. Go to https://www.anaconda.com/download.
2. Choose your operating system (Windows, macOS, or Linux).
3. Download the installer and run it.
4. Follow the on-screen steps and accept the default settings.
5. Once installed, open Anaconda Navigator from your applications menu.
After installation, Anaconda Navigator gives you a visual dashboard from which you can launch Jupyter Notebook, VS Code, and other tools, no command line required for beginners.
Step 2: Using Jupyter Notebook
Jupyter Notebook is the most beginner-friendly environment for learning Python and AI. It lets you write code in small, runnable blocks called cells, see the output immediately below each block, and mix code with notes and explanations.
Launching Jupyter Notebook: Open Anaconda Navigator and click Launch under Jupyter Notebook. It will open in your browser automatically.
Your first cell:
Once Jupyter opens, click New → Python 3 to create a notebook. In the first cell, type:

Press Shift + Enter to run it. You will see the output appear directly below the cell.
Why Jupyter works well for AI learners:
1. You can test small pieces of code without running the entire file.
2. Output (including graphs and tables) appears inline.
3. You can add text explanations between code blocks, making it great for learning and documentation.
Step 3: Setting Up VS Code (Optional but Recommended)
VS Code (Visual Studio Code) is a professional-grade code editor used widely in industry. Unlike Jupyter, it is better suited for writing full Python scripts and larger projects.
How to install:
1. Go to https://code.visualstudio.com.
2. Download and install the version for your operating system.
3. Open VS Code and go to the Extensions panel (left sidebar).
4. Search for Python and install the extension by Microsoft.
Connecting VS Code to Anaconda:
Once the Python extension is installed, press Ctrl + Shift + P (or Cmd + Shift + P on Mac) and type:

Choose the Anaconda environment from the list. This ensures VS Code uses the same Python and libraries that Anaconda installed.
Running a script in VS Code:
Create a new file called hello.py, type the following, and press the Run button (▶) at the top right:

Jupyter Notebook vs. VS Code — Which Should You Use?
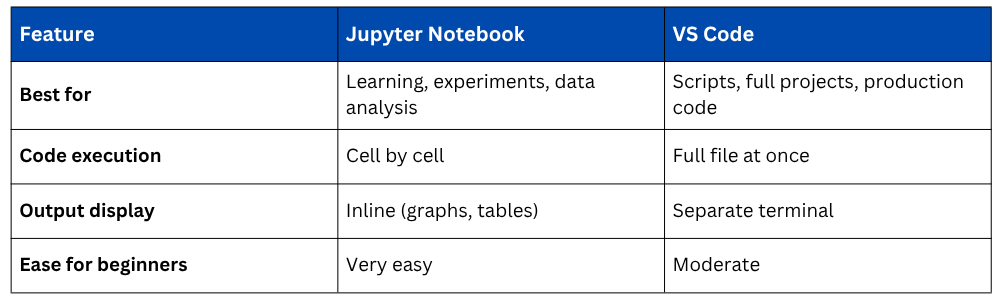
Recommendation: Use Jupyter Notebook while learning and experimenting. Switch to VS Code when you start building complete projects or working with multiple files.
Verifying Your Installation
Once everything is set up, open Jupyter Notebook or VS Code and run the following to confirm Python and key libraries are installed correctly:
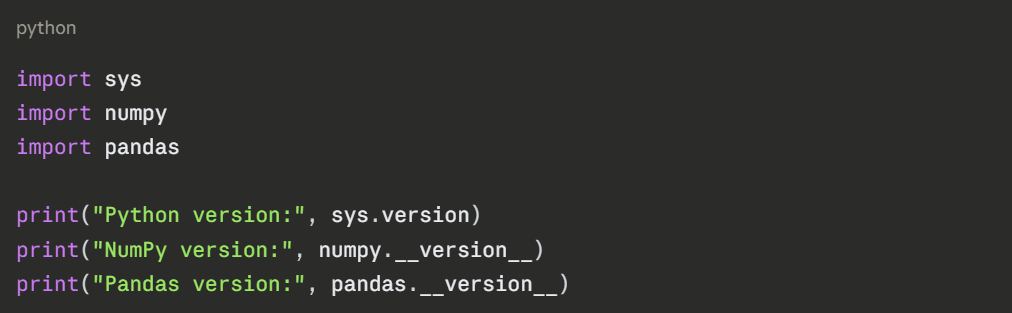
If all three lines print version numbers without any errors, your environment is ready.
Quick Troubleshooting
Jupyter not opening? — Restart Anaconda Navigator and try again, or open a terminal and type jupyter notebook.
Library not found error? — Open Anaconda Navigator, go to Environments, search for the library, and install it.
VS Code not finding Python? — Reselect the interpreter using Ctrl + Shift + P → Python: Select Interpreter.