HTML5 APIs extend basic markup into powerful interactivity without heavy JavaScript frameworks.
These APIs integrate seamlessly with the semantic HTML foundation from Module 1, preparing you for JavaScript DOM manipulation in later modules.
Canvas API: Dynamic Graphics and Animations
The Canvas API draws graphics directly in the browser using JavaScript—no images or SVGs needed.
It renders 2D shapes, text, and animations pixel-by-pixel, perfect for charts, games, and data visualizations.
Modern browsers support high-DPI displays through device pixel ratios, ensuring crisp rendering on Retina screens.
Getting Started with Canvas Basics
Access canvas via a <canvas> element and its 2D context.
<canvas id="myChart" width="400" height="200"></canvas>Core Setup Steps:

Basic Drawing Commands:
1. ctx.fillRect(x, y, width, height) – Filled rectangle
2. ctx.strokeRect(x, y, width, height) – Outline rectangle
3. ctx.arc(x, y, radius, startAngle, endAngle) – Circles/curves
4. ctx.fillText('Hello', x, y) – Text rendering
Practical Example: Simple Bar Chart
ctx.fillStyle = 'steelblue';

ctx.fillRect(50, 150, 50, -100); // Bar 1

ctx.fillStyle = 'coral';

ctx.fillRect(120, 150, 50, -70); // Bar 2
Canvas Paths, Gradients, and Images
1. Paths: create complex shapes; gradients add polish.
2. Paths: ctx.beginPath(), ctx.moveTo(), ctx.lineTo(), ctx.stroke()
3. Gradients: ctx.createLinearGradient() for smooth fills
4. Images: ctx.drawImage(img, x, y, width, height)

Animation Loop Pattern:
The animation loop pattern is a standard approach used in HTML5 Canvas animations to create smooth, continuous motion.
First, the canvas is cleared using ctx.clearRect() to remove the previous frame, preventing visual trails. Next, object positions and animation logic are updated, and the elements are redrawn in their new states. Finally, requestAnimationFrame(animate) schedules the next frame efficiently, syncing animations with the browser’s refresh rate for better performance and smoother visuals.
Example: Bouncing Ball
let x = 50, y = 50, dx = 2, dy = -2;

function animate() {

    ctx.clearRect(0,0,canvas.width,canvas.height);

    ctx.beginPath();

    ctx.arc(x, y, 20, 0, Math.PI*2);

    ctx.fill();

    x += dx; y += dy;

    if (x > canvas.width || x < 0) dx = -dx;

    requestAnimationFrame(animate);

}
Geolocation API: Location-Based Services
The Geolocation API accesses user location via GPS, WiFi, or IP—crucial for maps, delivery apps, and personalized content. It requires HTTPS in production and user permission.
Supported in 98% of browsers (2025 data), it returns latitude/longitude with accuracy estimates.
Requesting User Location
Always handle permission denials gracefully.
Basic Implementation
if ('geolocation' in navigator) {
navigator.geolocation.getCurrentPosition(success, error);
} else {
console.log('Geolocation not supported');
}
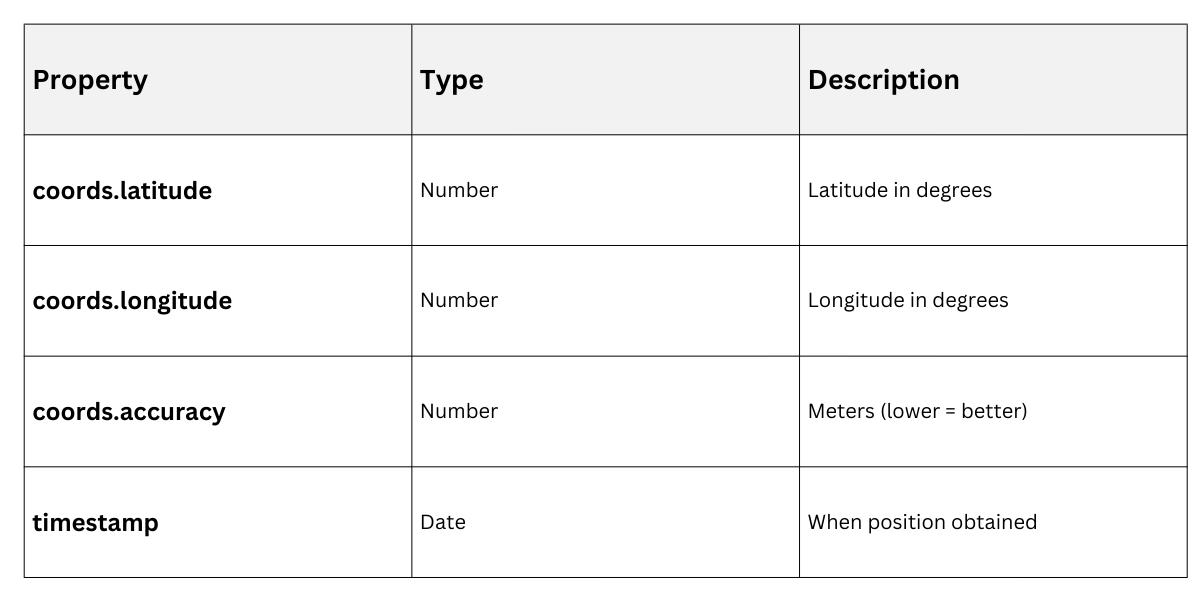
function success(position) {
const lat = position.coords.latitude;
const lng = position.coords.longitude;
console.log(`Lat: ${lat}, Lng: ${lng}`);
}
function error(err) {
console.error('Error:', err.message);
}Position Object Properties
Watch Position for Real-Time Tracking
watchPosition() tracks movement continuously.
Options for Precision:
1. { enableHighAccuracy: true } – GPS mode (battery drain)
2. { timeout: 10000 } – Max wait time
3. { maximumAge: 60000 } – Cache reuse
Example: Live Map Marker
const watchId = navigator.geolocation.watchPosition(

    pos => updateMap(pos.coords.latitude, pos.coords.longitude),

    err => console.error(err),

    { enableHighAccuracy: true }

);


// Stop watching: navigator.geolocation.clearWatch(watchId);
Drag-and-Drop API: Interactive User Experiences
The native Drag-and-Drop API lets users drag elements like files, cards, or images. No plugins needed—works on desktop/mobile with touch support.
Events fire on both source and target, giving precise control.
Drag Events and Attributes
Enable dragging with draggable="true".
Key Attributes:
1. draggable="true" – Makes element draggable:
Setting draggable="true" enables an element to be picked up and moved using drag-and-drop interactions. It allows browsers to recognize the element as draggable and trigger drag events.
2. dropzone – Custom drop areas:
The dropzone attribute defines specific areas where draggable elements can be dropped. Combined with CSS properties like display: contents, it helps create flexible, visually clean drop targets.
3. dataTransfer – Carries data between elements:
The dataTransfer object is used to store and transfer data during drag-and-drop operations. It enables information such as IDs or text to be passed from the dragged element to the drop target.
Drag Event Sequence:

Implementing a File Drop Zone
Common use case: Upload files by dragging.
HTML Setup:
<div id="dropZone" class="dropzone">Drop files here</div>JavaScript Handler:
const dropZone = document.getElementById('dropZone');


dropZone.addEventListener('dragover', e => {

    e.preventDefault(); // Required!

    dropZone.classList.add('highlight');

});


dropZone.addEventListener('dragleave', () => {

    dropZone.classList.remove('highlight');

});


dropZone.addEventListener('drop', e => {

    e.preventDefault();

    dropZone.classList.remove('highlight');

    const files = e.dataTransfer.files;

    console.log('Files:', files);

});
Sortable List with Drag-and-Drop
Complete Example: Task Reordering
<ul id="tasks">

    <li draggable="true">Task 1</li>

    <li draggable="true">Task 2</li>

</ul>let draggedItem = null;
document.querySelectorAll('#tasks li').forEach(item => {
item.addEventListener('dragstart', e => {
draggedItem = item;
e.dataTransfer.effectAllowed = 'move';
});
item.addEventListener('dragover', e => e.preventDefault());
item.addEventListener('drop', e => {
e.preventDefault();
if (draggedItem !== item) {
item.parentNode.insertBefore(draggedItem, item.nextSibling);
}
});
});Event Comparison


Class Sessions
Sales Campaign

We have a sales campaign on our promoted courses and products. You can purchase 1 products at a discounted price up to 15% discount.